How to build a custom post type in a custom theme
What does a custom post type do for your site?
We’ve talked about what a custom post type is before, in our custom theme development blog post last week. By default, WordPress comes with only one post type – the blog post. Adding more than one is only accomplished through custom post types. So if you want to run a website with both a blog, and other feeds, that’s what you’ll need. Here are a couple examples of when you need another feed – if you run a website with movie reviews, then you’ll probably want a different post type for those movie reviews. Or, if you run a shop, then having a custom post type for products is usually a good idea.
One of the main benefits of a custom post type is the ability to add custom fields to that post type. In the movie review example, you could add a field type for stars or other types of scores. For products, you can have field types for price or availability status. For this post, we’ll only be focusing on building the overall custom post type. But check back for the next Mr. WPress blog post where we expand on custom fields in those post types.
Writing the custom post type code
As an example, we’re going to build a Products post type in a WordPress site. First things first, we need to add a little code to the functions.php file of the theme. Here’s the code you should add at the top:
require_once "ssi/products.php";
This allows us to create a new file, called products.php, where we can work with all the functions for products. It’s generally good practice to do this, since it keeps everything all in one place and separate. So now, make a new php file in your ssi folder called products.php. At the top of file, we want this code:
<?php

add_action( 'init', 'acg_product_create_type' );
add_action( 'init', 'acg_product_taxonomy', 0 );
add_action( 'init', 'acg_product_tags', 1 );
WordPress comes with some default actions, one of which is the initial load up action, or “init.” We can piggyback onto that init hook to make sure that WordPress grabs these functions before it starts to display the site, saving load time and preventing potentially funky user experiences.
Creating the custom post type itself
With the functions made, we’ll focus on the create type function first. As you probably guessed from the name, this is the function that creates the product post type. Below the lines we just typed, add this code:
function acg_product_create_type() {

    register_post_type('product',
        array(
            'labels' => array(
                'name'                      => __('Products', 'acg'),
                'singular_name'             => __('Product', 'acg'),
                'add_new'                   => __('Add New', 'acg'),
                'add_new_item'              => __('Add Product', 'acg'),
                'new_item'                  => __('Add Product', 'acg'),
                'view_item'                 => __('View Product', 'acg'),
                'search_items'              => __('Search Products', 'acg'),
                'edit_item'                 => __('Edit Product', 'acg'),
                'all_items'                 => __('All Products', 'acg'),
                'not_found'                 => __('No Products found', 'acg'),
                'not_found_in_trash'        => __('No Products found in Trash', 'acg')
            ),
            'taxonomies'    => array('product-category', 'product-tags'),
            'public' => true,
            'show_ui' => true,
            'capability_type' => 'post',
            'hierarchical' => false,
            'rewrite' => array( 'slug' => 'products', 'with_front' => false ),
            'query_var' => true,
            'supports' => array('title','revisions','thumbnail','author','editor','post-formats', 'custom-fields'),
            'menu_position' => 5,
            'menu_icon' => 'dashicons-cart',
            'has_archive' => true
        )
    );
}
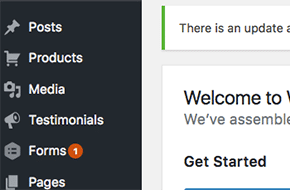
This creates the post type, as well as setting many of its attributes. The first is labels, which changes the appearance of all of the functions in the WordPress dashboard to accurately describe what they do. No longer is it “Add Post” or “All Posts,” we’ve changed it to “Add Product” and “All Products” via the labels.
You can delve into what all of these do in the custom post type entry in the WordPress codex, but the most important ones are rewrite, has_archive, and supports. Rewrite changes the URL slug, preventing conflicts with pages that potentially already exist. Make sure this is unique! Has_archive we have set to true, giving the post type an archive. If this is false, you won’t be able to have a page of all your products, or have a feed of them displayed somewhere, or anything like that. The supports give the post type its metadata – title, author, etc. Everything that makes a post a post outside of the content! You’ll notice custom fields are in there too, which is what we’re going to cover next week.
Giving the custom post type categories and tags
The next two functions we described were for the product taxonomy (or categories) and tags. Categories allow for easy sorting, and tags allow for a connection between relevant products. If we were selling clothing, we could have categories for shirts, pants, hats, etc. Then, each piece of clothing that had a rabbit on it could be connected by giving them all a “rabbit” tag.
To add this capability to the posts, here’s the code we want to add below the first function:
function acg_product_taxonomy() {
    // Add new taxonomy, make it hierarchical (like categories)
  $labels = array(
    'name' 		=> _x( 'Categories', 'taxonomy general name', 'acg'),
    'singular_name' 	=> _x( 'Category', 'taxonomy singular name', 'acg'),
    'search_items' 	=>  __( 'Search Categories', 'acg'),
    'all_items' 	=> __( 'All Categories', 'acg'),
    'parent_item' 	=> __( 'Parent Category', 'acg'),
    'parent_item_colon' => __( 'Parent Category:', 'acg'),
    'edit_item' 	=> __( 'Edit Category', 'acg'),
    'update_item' 	=> __( 'Update Category', 'acg'),
    'add_new_item' 	=> __( 'Add New Category', 'acg'),
    'new_item_name' 	=> __( 'New Category Name', 'acg'),
    'menu_name' 	=> __( 'Categories', 'acg')
  );

    register_taxonomy('product-category','product',array(
                'hierarchical' => true,
                'labels' => $labels,
                'query_var' => true,
                'rewrite' => array( 'slug' => 'product-category' )
    ));
}

function acg_product_tags() {
    register_taxonomy( 'product-tags', 'portfolio', array(
                'hierarchical' => false,
                'update_count_callback' => '_update_post_term_count',
                'label' => __('Tags', 'acg'),
                'query_var' => true,
                'rewrite' => array( 'slug' => 'product-tags' )
    )) ;
}
All this does is essentially reuse the default WordPress functions for taxonomy and tags, but renames them to make them specific to the products post type. We don’t want them overlapping, after all.
Outputting the posts on the site
Great! With that code in our theme, there should be a Products menu item in the back end of our WordPress website. Now we can add any number of products we want, with all relevant information. By default, WordPress will grab the templates for post types that already exist, such as single.php and archive.php. There are a couple of ways to change up how the product displays as compared to the blog:
There should be a file called single.php already in your theme. Just make a copy of that file, and rename it single-product.php. Since we already named our new post type ‘product’ in our first function, WordPress is smart enough to know that this new file overrides the default one. Then from there, you can remove anything that displays on single blog posts you don’t want for your custom post type, and add things you do want. And none of it affects how the blog displays, since you’re working in a whole new file. The same applies to all other relevant pages. If you want the archive page to look different for products, just make a new file called archive-product.php.
The second method is more intensive, but allows for greater customization. Say, for instance, you wanted to add a function so that only products under $20 would appear. That’s accomplished through WP_Query, which you can explore in more detail here. For the sake of space, we won’t cover this method in as much detail. But essentially, this is a way to create queries that check for certain information (price, category, etc.), and react differently whether the conditions are met or not.
And there you have the basics of building a custom post type. Be sure to play around with all your options, and see how customized you can make your new post type. Finally, don’t forget to check back next time, when we cover custom fields in these posts!
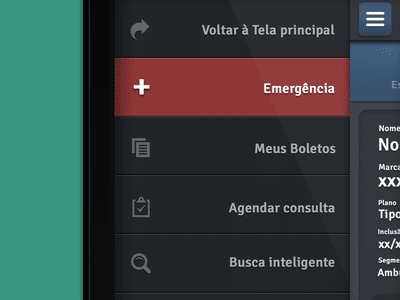 How to Build a Handy Slideout Menu in jQuery
 The Display Options of HTML Elements
 Cost of Web Development: Price, Quality, or Time (Pick Two)